Coloring book? Floodfill?

Hi guys.

I was wondering. Something very simple is causing me headache ;).

I's like to make a very small coloring book app. The app loads a 800x600px PNG (which is a line drawing with black lines and white background like in a coloring book) and then if you click mousedown in the picture, i would like to floodfill color this zone in red.

This is of course a oversimplificated version, but is there a way to do this in ZIM ?

I guess somehow I would need to be able to read the PNG as some kind of bitmap object and then.... set individual pixels somehow, but hoping there is some kind of faster floodfill ?

I'm actually completely stuck on something that (i guess) should be fairly simple ?

put the white background in a png. when you click on it apply a ColorEffect. if you want the black lines to be visible put them on a separate png on top of the white background

I think @amihanya did some coloring apps in the past...

I see what you mean there, but I really need a floodfill solution, because honestly it will probably involve 1000 or more coloring plates and it's not supposed to have a lot of separate preparation per image.

I would simply need a floodfill equivalent

Maybe I should rephrase my question a little. When I preload a poes.png using the code below, CAN I somehow GET and SET the color of a single pixel of this bitmap ?

ZIM - Code Creativity
<!-- zimjs.com - JavaScript Canvas Framework -->
<script type="module">

    import zim from "https://zimjs.org/cdn/017/zim";

    // See Docs under Frame for FIT, FILL, FULL, and TAG
    new Frame(FIT, 1024, 768, light, dark, ready);
    function ready() {


        F.loadAssets("poes.png");

        F.on("complete", () => {
            var catimg = new Pic("poes.png").center();
            console.log(catimg.bitmap);

        });

    } // end ready

</script>
<meta name="viewport" content="width=device-width, user-scalable=no" />

Yes - but would advise to wait for @amihanya response as he has done exactly what you are wanting to do.

catimg.bitmap.getColorAt(x,y,array) - returns the rgba() value at the x and y location - passes array of [r,g,b,a] if array parameter is true

Setting it is a different matter... maybe just draw into a Shape on top of it.

Ok I'll have to wait a little then for @amihanya 's answer.

In the meanwhile I found out that you can somehow get to the image data, but.... the code below should mess with the image data by writing some values in it... and the image certainly doesn't update.

So I'll wait a little.

ZIM - Code Creativity
<!-- zimjs.com - JavaScript Canvas Framework -->
<script type="module">

    import zim from "https://zimjs.org/cdn/017/zim";

    // See Docs under Frame for FIT, FILL, FULL, and TAG
    new Frame(FIT, 1024, 768, light, dark, ready);
    function ready() {


        F.loadAssets("poes.png");

        F.on("complete", () => {
            var catimg = new Pic("poes.png").center();

            for (let i = 1000; i <= 200000; i++) {
                catimg.bitmap.imageData.data[i] = 155;
            }

            console.log(catimg.bitmap.imageData.data[1500]);

            S.update();
        });

    } // end ready

</script>
<meta name="viewport" content="width=device-width, user-scalable=no" />

You would then need to draw the image data - from the Bitmap docs - see the last line:

// fill a Bitmap with noise:
const noise = new Noise();
// empty Bitmap size 200, 200
const bmp = new Bitmap(null,200,200).center();
// we fill the bitmap starting from top left going across in the inner loop,
// then down, then across, etc. until we get to bottom right.
const f = 50; // used to make noise bigger or smaller - see the blob comment below
for (let y = 0; y < bmp.height; y++) {
   for (let x = 0; x < bmp.width; x++) {
      // the noise methods return a number from -1 to 1
      // by adding 1 we get a number between 0 and 2 then divide by 2
      // and we multiply this by 255 to get a number between 0 and 255
      let value = (noise.simplex2D(x, y)+1)/2 * 255;
      // or get blobs by smoothing and adjusting frequency:
      // var value = smoothStep((noise.simplex2D(x/f, y/f)+1)/2, .3,.35) * 255;
      // imageData is four values per pixel
      // the red, green, blue and alpha
      // in one big long array - each value will be constrained to between 0 and 255
      // this i value will increase by 4 each time
      // then we write the same value for red, green, blue to get a shade of grey
      let i = (x + y * bmp.width) * 4;
      bmp.imageData.data[i] = value; // red (0-255)
      bmp.imageData.data[i + 1] = value; // green (0-255)
      bmp.imageData.data[i + 2] = value; // blue (0-255)
      bmp.imageData.data[i + 3] = 255; // alpha (0-255)
   }
}
bmp.drawImageData();

ok now I do see a change, but my original image is gone.

The original image in poes.png is an image of a cat. After the for loop and the drawImageData I get a grey part in the image, but all the rest is gone (I think I get (155,155,155) grey color :wink: . So what I need to find now is how to do it on the existing image itself. It looks like the original data is not taken to start with.

<script type="module">

    import zim from "https://zimjs.org/cdn/017/zim";

    // See Docs under Frame for FIT, FILL, FULL, and TAG
    new Frame(FIT, 1024, 768, light, dark, ready);
    function ready() {


        F.loadAssets("poes.png");

        F.on("complete", () => {
            var catimg = new Pic("poes.png").center();

            for (let i = 1000; i <= 200000; i++) {
                catimg.bitmap.imageData.data[i] = 155;
            }

            catimg.bitmap.drawImageData();


            S.update();
        });

    } // end ready

</script>
<meta name="viewport" content="width=device-width, user-scalable=no" >

we have a coloring game

we use floodFill in bitmapdata-1.1.1.min.js

i think its from here:

1 Like

https://dersekranda.com/3dTest/imageToBitmap/ Here is an example I made. Let me share the codes as a zip. I have a bit of a complicated coding scheme. It might be useful for you.

1 Like

imageToBitmap.zip (849.5 KB)
If the images are too pixelated, they won't paint well. The edges of the image should be black and the rest should be white. If the edges are another color instead of black, the edges will also be painted.

Thank you guys for the info and demo code. Unfortunately I'm afraid that it is too complicated for me. I already create apps for a long time... but this code... I just don't get it.

Great! :slight_smile:

Can SVGs be utilized? I see the coloring seems off around the outline.

you need to convert it to bitmap

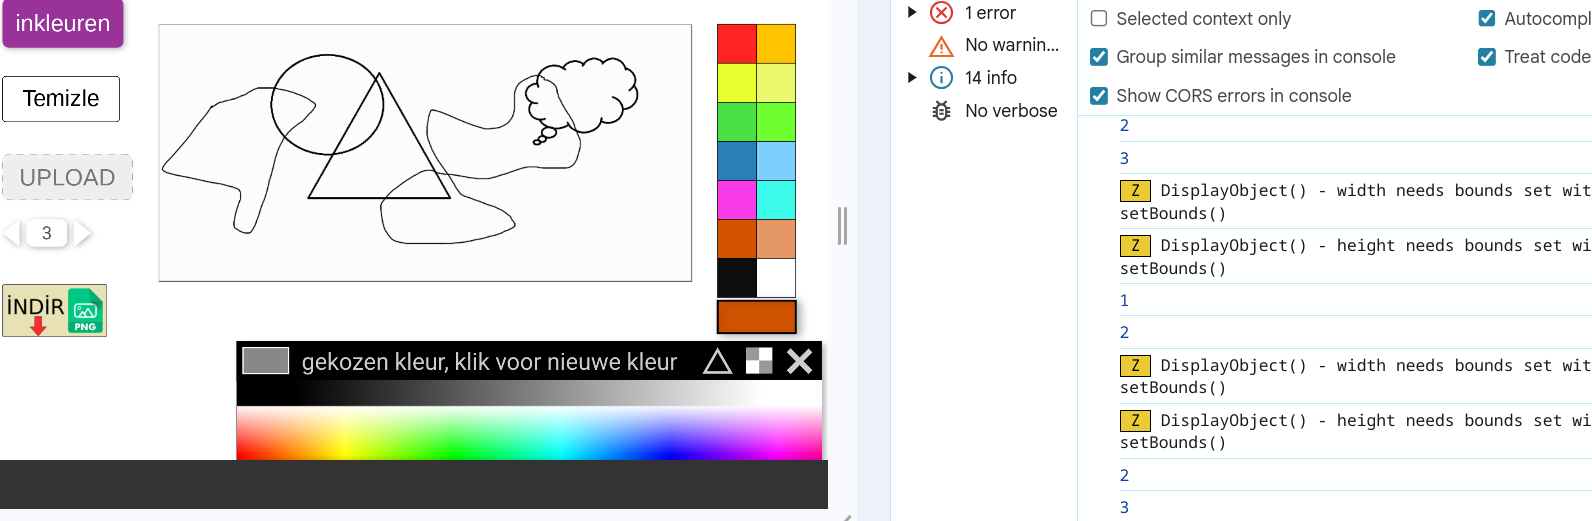
For the people interested in analysing the sekiller.js file and not being familiar with Turkish (like me) I have made a bare minimum file with most variables translated to English. I also removed a lot of the functionality so that currently it runs, has the 14 color selection boxes and the bottom selected color rectangle and you can floodfill. I removed all functionality to clear the image, load another image or save the image to png. This makes it a lot easier to study how the coloring book works and I'd like to share it with everybody.

function sekiller() {
  function rgbaToHex(rgba) {
    var matches = rgba.replace(/\s/g, "").match(/^rgba?\(([\d,\.]+)\)/i);
    if (!matches || matches.length < 2) {
      return 0;
    }
    var splits = matches[1].split(",");
    if (splits.length < 4) {
      return 0;
    }
    var colors = [];
    for (var i = 0, l = 4; i < l; i++) {
      var c;
      if (i !== 3) {
        c = parseInt(splits[i]);
        if (isNaN(c)) {
          return 0;
        }
      } else {
        c = parseFloat(splits[i]);
        if (isNaN(c)) {
          return 0;
        }
        c = Math.round(c * 255);
      }
      colors[i] = Math.min(c, 255);
    }
    return ((colors[3] << 24) | (colors[0] << 16) | (colors[1] << 8) | colors[2]) >>> 0;
  }

  var paintImage; // A reference to the loaded png asset
  var paintContainer;
  var myBitmapData;
  var bitmapImageObject;
  var CurrentColorRGB = "255, 35, 35";
  var bitmapDataContainer = new Container();
  stage.addChild(bitmapDataContainer);

  function changeImageToBitmap(usedAsset) {
    while (bitmapDataContainer.numChildren > 0) {
      bitmapDataContainer.removeChildAt(0);
    }

    paintImage = usedAsset;

    paintContainer = new Container();
    bitmapDataContainer.addChild(paintContainer);

    paintImage.width = 820;
    paintImage.height = 580;

    if (paintImage.width > 820) {
      paintImage.width = 820;
    }

    paintContainer.addChild(paintImage);
    paintContainer.cache(0, 0, 1440, 800);
    paintContainer.x = 250;
    paintContainer.y = 250;

    myBitmapData = new createjs.BitmapData(paintContainer.cacheCanvas);
    bitmapImageObject = new createjs.Bitmap(myBitmapData.canvas);

    bitmapDataContainer.removeChild(paintContainer);
    bitmapDataContainer.addChild(bitmapImageObject);

    bitmapImageObject.x = 1440 / 2 - paintImage.width / 2 - 50;
    bitmapImageObject.y = 800 / 2 - paintImage.height / 2;
    stage.update();

    bitmapImageObject.addEventListener("mousedown", fillAtPoint);
  }

  changeImageToBitmap(new asset("boyama.png"));

  function fillAtPoint(e) {
    var pt = e.target.globalToLocal(stage.mouseX, stage.mouseY);
    myBitmapData.floodFill(pt.x, pt.y, rgbaToHex("rgba(" + CurrentColorRGB + ", 1)"));
    zog("kleuren op (" + pt.x + "," + pt.y + ")");
    stage.update();
  }

  var colorContainer = new Container();
  stage.addChild(colorContainer);
  var defaultColors = ["#FF2323", "#FFC300", "#E9FF30", "#E9F86C", "#49E144", "#6FFF30", "#2980B9", "#7ccfff", "#FA3BE9", "#3BFAE9", "#D35400", "#E59866", "#0e0e0e", "#FFFFFF"];
  var colorSelectRectangles = [];

  var selectedColorRectangle;
  function showColorSelections() {
    for (var i = 0; i < defaultColors.length; i++) {
      rect = new Rectangle(60, 60, defaultColors[i], black);
      rect.x = (i % 2) * rect.width + 1440 - rect.width * 2 - 50;
      rect.y = Math.floor(i / 2) * rect.height + 120;
      colorContainer.addChild(rect);
      new createjs.ButtonHelper(rect);
      colorSelectRectangles.push(rect);
      colorSelectRectangles[i].addEventListener("mousedown", selectColor);
    }

    selectedColorRectangle = new Rectangle(120, 60, "#FF2323", black);
    selectedColorRectangle.x = 1270;
    selectedColorRectangle.y = 540;
    colorContainer.addChild(selectedColorRectangle);
  }

  showColorSelections();

  function selectColor(e) {
    var currentColorbox = e.currentTarget;
    zog("Color selected " + currentColorbox.color);
    if (currentColorbox.color == "#000000") {
      currentColorbox.color = "#0e0e0e";
    }
    CurrentColorRGB = "" + hexToRgb(currentColorbox.color).r + "," + hexToRgb(currentColorbox.color).g + "," + hexToRgb(currentColorbox.color).b + "";
    selectedColorRectangle.color = currentColorbox.color;

    function hexToRgb(hex) {
      var result = /^#?([a-f\d]{2})([a-f\d]{2})([a-f\d]{2})$/i.exec(hex);
      return result
        ? {
            r: parseInt(result[1], 16),
            g: parseInt(result[2], 16),
            b: parseInt(result[3], 16),
          }
        : null;
    }
  }
}

2 Likes

I would like to point out that I made a change in BitmapData.js so that black colors are not painted. If you use the new version of BitmapData.js in the future, you will need to make the change here.

p.floodFill = function(x, y, color) {
if (this._contextChanged) this.updateImageData();
var imgData = this._imageData;
var w = imgData.width;
var h = imgData.height;
x = x >> 0;
y = y >> 0;
if (x < 0 || y < 0 || w <= x || h <= y) {
return;
}
var targetColor = this.getPixel32(x, y);
//alert(targetColor)
//4278190080 //// this black color....
if (targetColor === color||targetColor===4278190080) {
return;
}

Change made part: if (targetColor === color||targetColor===4278190080) {
return;
}

I almost get it working.. but not coloring if I click onto the objects.. any idea how to solve?

https://webtinq.nl/inkleuren and https://webtinq.nl/inkleuren2 in only 2 files index.html and one BitmapData.js